
How to Build a Hot Air Solar Collector for a Room
The rising costs of residential home heating makes solar power an attractive energy alternative for many people. Not only can you harness and use the energy provided freely by the sun, but solar home heating is a low-impact, environmentally-friendly way to heat your home. Here is some information on how to build a hot air solar collector.
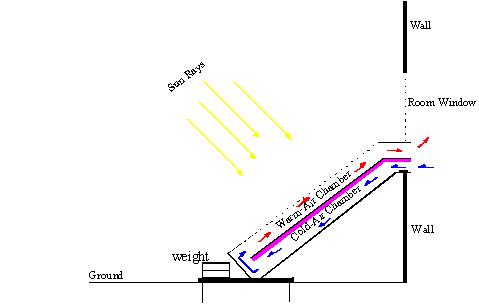
Figure 1
How It Works
As the sun rays pass through the glass, the dark surface on the panel absorbs the solar energy and warms the air above it. The warm air rises and leaves the top of the unit as cooler air is drawn in from the bottom. The insulation barrier separates the two chambers and allows the natural movement of the convection current.
Power is not required for these heaters. The natural upwards movement of hot air leaving the top will draw in cooler air at the bottom. As long as there's a temperature difference between the two chambers, air will continue to circulate through the heater.
How to Build a Hot Air Solar Collector for a Room
- These units will only work with vertical sliding windows. Make the width of the collector as wide as the window so no extra air-dams will be required.
- Create a tight fitting box in roughly the same shape as shown in Figure 1. Plywood is inexpensive, easy to work with and provides good strength. The depth of the unit should be at least 3" to allow for the two chambers. The depth of the individual chambers doesn't matter as long as there's an air-path at the bottom between the two.
- To create the two chambers use a sheet of rigid, pink insulation. Paint one side black and have it facing upwards. The insulation can be as thin as 1/4" and needs small supports to rest on. Attach 1" standoffs on the bottom surface of the unit to support the lightweight panel. Make the gap at the bottom at least 1" wide to allow air to circulate between the two chambers.
- Attach a glass cover to the unit or use transparent plastic. Plastic is more convenient but should be clear, not semi-transparent, and needs to be securely attached. Glass is more sturdy but more expensive.
- Secure the bottom of the unit to the ground. It needs to withstand rain, wind and snow and an attached wood panel that's weighed down will work. The downward angle of the unit will prevent most snow from collecting on the unit.
- The window will be closed on top of the unit and weather-stripping may be placed to create a tighter seal.
Where to Install
These units are most effective on south facing windows & roofs. Despite the outside air temperature, the sun will heat the dark surface of the panels. The temperature increase of the warmed air will depend on the amount of surface area of the panel and how direct the sun is shining on the unit. The larger the unit and the more direct the sun, the hotter the air will be. You should place your unit in a location with the most amount of sun and least amount of shadows as possible.
Since it would be most advantageous to use this free heat in winter, build the unit resting at an angle to maximize the winter sun. Typically, the ideal angle to position a south-facing unit is your latitude + 10 degrees. You may have to test for the optimum angle in your location. In the summer, remove this portable unit from the window or close off the indoor vents to avoid adding unnecessary heat from entering the room.
Closed vs. Open Systems
This unit efficiently draws cool air from the bottom and returns the same air warmed by the thermal panel. A closed system requires separate upper and lower chambers. A modification on this hot air solar collector unit is to have an open system which only has one chamber that draws in cool outside air. However, in winter, the cold outside air may be too low in temperature for the thermal panel to sufficiently warm. It's also open to the outside thus allowing insects and other critters indoors.